Appearance
Android Sample Application
The Sample Application (also abbreviated as "Sample App") is a reference project for implementing an application based on the Binah.ai SDK.
Building the Sample Application
The instructions below refer to sample applications in the Java and Kotlin languages using the Android Studio IDE. Follow these instructions to build the sample application and run it on your own device.
1. Open the sample app project in Android Studio
You may see an error message about a missing bnhsdk.aar file. This will be solved after completing the following steps.
2. Create the SDK folder
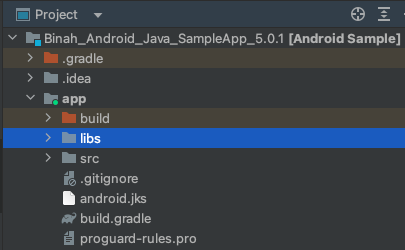
Create a folder named libs under the app folder. 
3. Add the SDK to the application
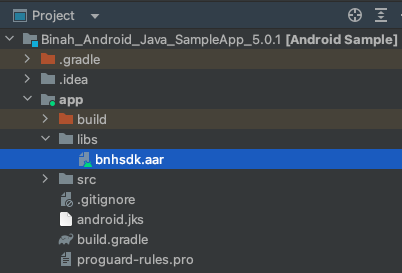
Place the bnhsdk.aar file inside the newly created libs folder. 
4. Sync with Gradle
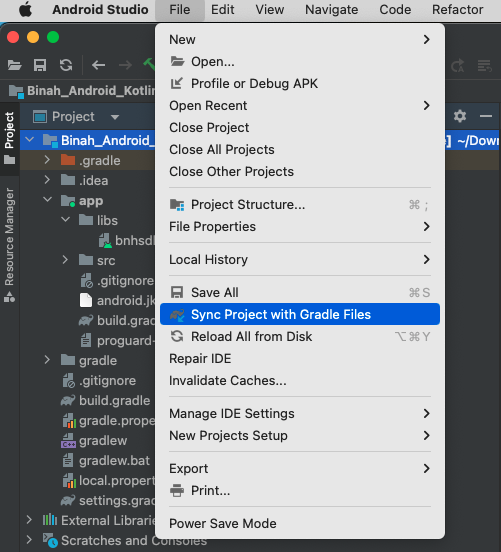
Click File->Sync Project with Gradle Files to make Android Studio to load and index the SDK.

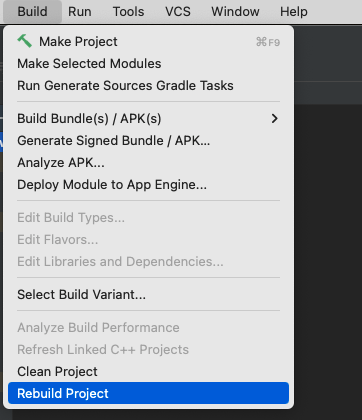
Click Build->Rebuild Project to rebuild the project.

5. Set the License Key
- Open the
MainActivityfile of your project (MainActivity.javafor the Java Sample application orMainActivity.ktfor the Kotlin sample application). - Replace the
<ENTER_YOUR_LICENSE_KEY>string with the license key that you received from Binah.ai.
Kotlin
class MainActivity : AppCompatActivity(),
    ImageListener, VitalSignsListener, SessionInfoListener {

    companion object {
        const val licenseKey = "<ENTER_YOUR_LICENSE_KEY>"
        const val measurementDuration = 60L
    }

    ...
}
Java
public class MainActivity extends AppCompatActivity
        implements ImageListener, VitalSignsListener, SessionInfoListener {

    private static final String LICENSE_KEY = "<ENTER_YOUR_LICENSE_KEY>";
    private static final long MEASUREMENT_DURATION = 60;
    ...
}
6. Configure the measurement duration (optional)
- Open the
MainActivityfile of your project (MainActivity.javafor the Java Sample application orMainActivity.ktfor the Kotlin sample application). - Update the value of the measurement duration (
MEASUREMENT_DURATIONin Java ormeasurementDurationin Kotlin) with a value between 20 to 180. The value represents the measurement duration in seconds. The sample application allows the user to stop the measurement before the defined measurement duration.
Note
Each vital sign has a minimal measurement duration that is required for calculating its value. Refer to the Report Timings page.
Kotlin
class MainActivity : AppCompatActivity(),
    ImageListener, VitalSignsListener, SessionInfoListener {

    companion object {
        const val licenseKey = "<ENTER_YOUR_LICENSE_KEY>"
        const val measurementDuration = 60L
    }

    ...
}
Java
public class MainActivity extends AppCompatActivity
        implements ImageListener, VitalSignsListener, SessionInfoListener {

    private static final String LICENSE_KEY = "<ENTER_YOUR_LICENSE_KEY>";
    private static final long MEASUREMENT_DURATION = 60;

    ...
}
7. Run the Application
Now the application is ready to run.
- Connect an Android device to your computer.
- Click the Start button.
Measuring Vital Signs
- Position your face in the center of the camera preview.
- Click the Start button and verify that you see the face detection graphics (bounding rectangle).
- Pulse Rate vital sign values (this is an example of an "instantaneous" value) should be received after approximately 11 seconds.
- After the measurement stops (either by tapping on the Stop button or at the end of the defined measurement duration), an alert with the Pulse Rate and Mean RRi results will be shown (this is an example of a "final" result).
- Also see the following relevant pages:
- Best practices on how to take a measurement
- SDK Accuracy Targets and Report Times
- SDK Alerts